快速用Photoshop给眼睛上色
来源:作者:佚名 来源:78ps教程网
作者:admin
学习:1318人次
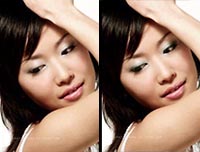
效果图
 眼睛素材图
眼睛素材图

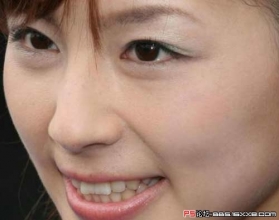
1.打开原图,用椭圆选框工具把眼睛圈起来,然后按SHIFT+CTRL+N新建图层1

2.保持选区,然后我们用渐变工具,设置前景色为#0aa5ed,背景色#42c502 ,选中径向渐变,从中心向外拉一个#0AA5ED到#42C502径向渐变在图层1上,把图层1模式改为叠加,这样眼珠的颜色就漂亮多了。按CTRL+D取消选区
3.用橡皮擦工具擦掉多余的颜色

4.你可以按CTRL+J复制图层1得到图层1副本,使眼睛更加亮
5.最后我们添加一个光照效果,使眼睛周围更加暗来突出眼睛。
对背景图层(即原图)执行滤镜--渲染--光照效果(light type:全光源)

6.继续,添加光照效果后,执行编辑--渐隐光照效果:
不透明度:70% ; 模式:叠加
眼睛素材图1.打开原图,用椭圆选框工具把眼睛圈起来,然后按SHIFT+CTRL+N新建图层1
2.保持选区,然后我们用渐变工具,设置前景色为#0aa5ed,背景色#42c502 ,选中径向渐变,从中心向外拉一个#0AA5ED到#42C502径向渐变在图层1上,把图层1模式改为叠加,这样眼珠的颜色就漂亮多了。按CTRL+D取消选区
3.用橡皮擦工具擦掉多余的颜色
4.你可以按CTRL+J复制图层1得到图层1副本,使眼睛更加亮
5.最后我们添加一个光照效果,使眼睛周围更加暗来突出眼睛。
对背景图层(即原图)执行滤镜--渲染--光照效果(light type:全光源)
6.继续,添加光照效果后,执行编辑--渐隐光照效果:
不透明度:70% ; 模式:叠加
学习 · 提示
相关教程
关注大神微博加入>>


网友求助,请回答!