当前位置:首页>ps实例教程>ps网页设计>logo教程>教程内容

PS制作Google Chrome浏览器Logo图标(2)

来源:未知 作者:admin 学习:14740人次

Using the same tool, try to make the next layer of the same element. Firstly apply the Ellipse Tool (U) to mark out the outside edges of the layer and then choose the Pen Tool (P) to cut out an inside opening. Its shape may be corrected with the Convert Point Tool.
再用椭圆工具重复上一步骤,画一个同样的圆边缘与之前的重合(译者:或直接复制一层去掉图层样式),然后用钢笔工具(P)在其内部切出我们需要的形状(译者:选择"从形状区域减去"或按住Alt键),然后利用转换点工具进行调整

The layer parameters: Blending Options>Bevel and Emboss
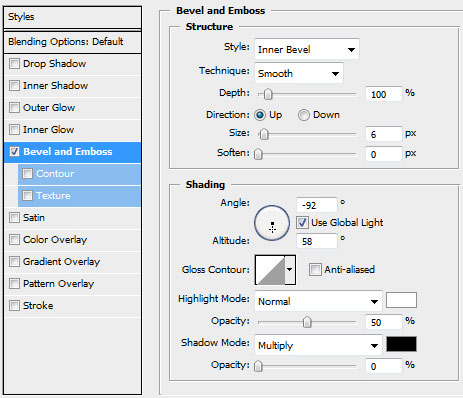
设置图层样式,选择斜面和浮雕(参数如下)

Make a copy of the recently made layer and use on it the Free Transform option. Press Maintain aspect ratio and make uniformly the copy smaller and then displace it easily. Move off the layer effect out of the copy. Select also the color #4E4A4A for the layer copy. Place the new layer under the previous one. This will be the shadow layer.
将此图层复制一份,使用自由变换工具,选择保持长宽比,均匀的缩小图层,去掉图层样式.选择颜色#4E4A4A,然后把这个复制层放在原图层的下方.这将作为阴影效果层


学习 · 提示

  • 一定要打开PS,跟着教程做一遍,做完的图到这交作业:提交作业
  • 建议练习时,大家自己找素材,尽量不要用教程提供的素材。
  • 教程有看不懂的地方,可以到论坛发帖提问:新手求助
  • 加官方微信,随时随地,想学就能学:ps_bbs,或扫右侧二维码!
  • 关注我们学更多,每天都有新教程:新浪微博 抖音视频 微信小程序
- 发评论 | 交作业 -
最新评论
暂无评论,交个作业支持一下吧~

关注大神微博加入>>

网友求助,请回答!