PSИјТўЛЩЯЩЋНЬГЬ
РДдДЃКВЛЯъ
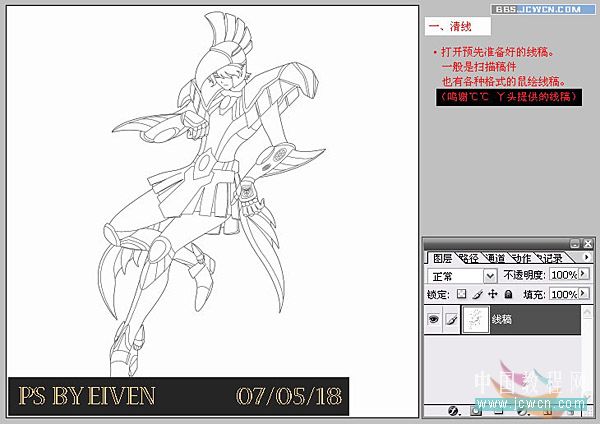
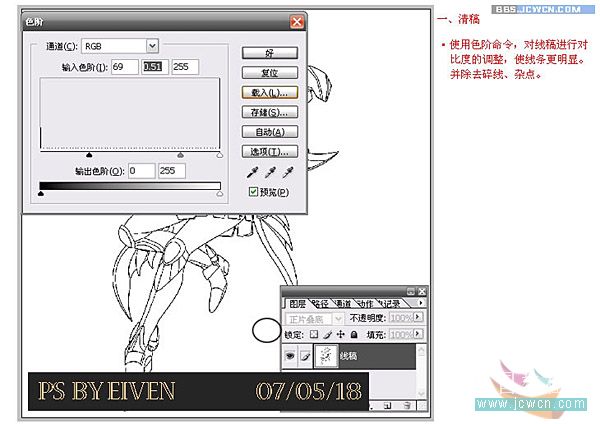
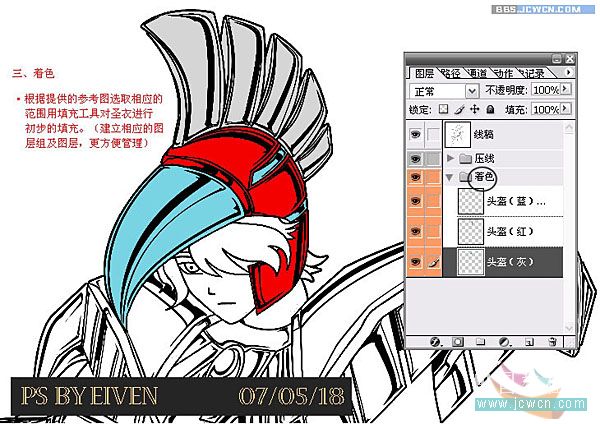
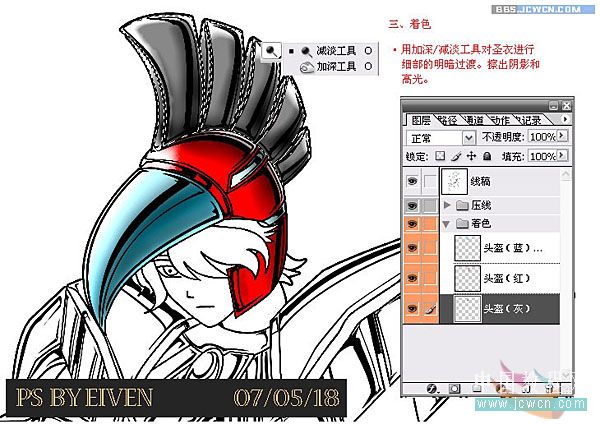
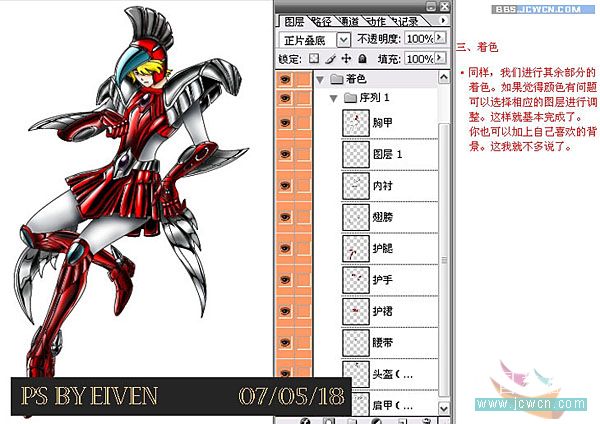
зїепЃКи§Ућ
бЇЯАЃК4832ШЫДЮ
PSИјТўЛЩЯЩЋНЬГЬ зїепЃКeiven_0709 НЬГЬРДдДЃКжаЙњНЬГЬЭјТлЬГ
ЯпИхЃК
зюКѓаЇЙћ
БОаТЮХЙВ5
ЯТУцЮвОЭМђЕЅЫЕЯТЙ§ГЬАЩЃКЃЉ
ЧхЯп
ЁЄДђПЊдЄЯШзМБИКУЕФЯпИхЃЌвЛАуЪЧЩЈУшИхМўЃЌвВгаИїжжИёЪНЕФЪѓЛцЯпИх
ЧхИх
ЁЄЪЙгУЩЋНзУќСюЃЌЖдЯпИхНјааЖдБШЖШЕФЕїећЃЌЪЙЯпЬѕИќУїЯдЃЌВЂГ§ШЅЫщЯпЃЌдгЕуЁЃ
БОаТЮХЙВ5
бЙЯп
ЁЄЪЙгУИжБЪЙЄОпЖдЪЅвТНјааАЕВПЕФЙДЯпЁЃЃЈЭЗВПЮЊЕЙЃЉЙДЯпЪБзЂвтЬдЬЕФЗНЯђЕШЁЃЭЌбљНЋЪЅвТЦфгрЕФВПЗжЙДЯпЁЃ
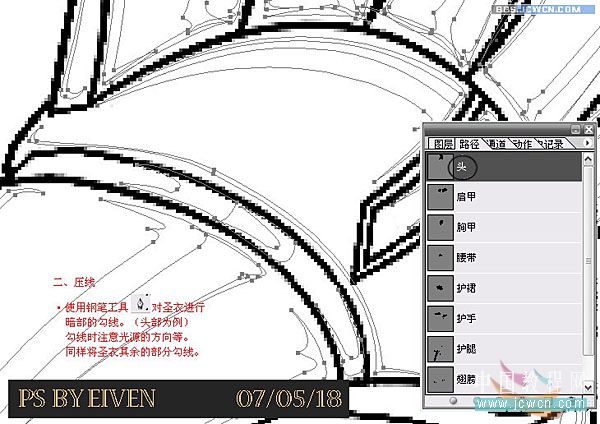
ЁЄЪЙгУТЗОЖЬюГфЙЄОпЖдЪЅвТНјааАЕВПЕФЬюГфЁЃЃЈНЈСЂЯргІЕФЭМВузщИќЗНБуЙмРэЃЉЁЃ
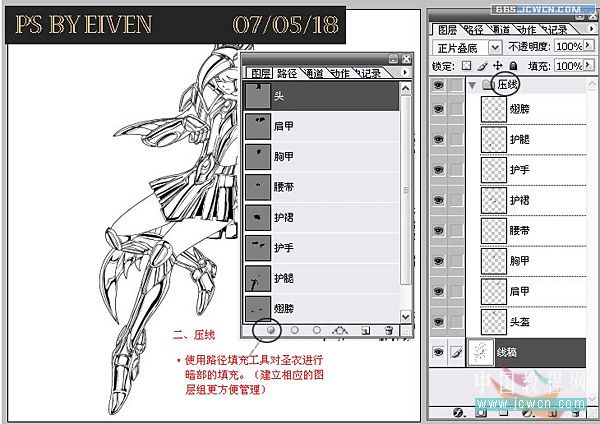
БОаТЮХЙВ5
зХЩЋ
ЁЄИљОнЬсЙЉЕФВЮПМЭМбЁШЁЯргІЕФЗЖЮЇгУЬюГфЙЄОпЖдЪЅвТНјааГѕВНЕФЬюГфЁЃЃЈНЈСЂЯргІЕФЭМВузщМАЭМВуЃЌИќЗНБуЙмРэЃЉ
ЁЄгУМгЩю/МѕЕЙЄОпЖдЪЅвТНјааЯИВПЕФУїАЕЙ§ЖЩЃЌВСГівѕгАКЭИпЙтЁЃ
БОаТЮХЙВ5
ЁЄЭЌбљЃЌЮвУЧНјааЦфгрВПЗжЕФзХЩЋЃЌШчЙћОѕЕУбеЩЋгаЮЪЬтПЩвдбЁдёЯргІЕФЭМВуНјааЕїећЁЃетбљОЭЛљБОЭъГЩСЫЁЃФувВПЩвдМгЩЯздМКЯВЛЖЕФБГОАЁЃетЮвОЭВЛЖрЫЕСЫЁЃ
КУСЫЃЌдйКѓУцЕФОЭгЩДѓМвздМКЗЂЛгСЫКЧКЧЃКЃЉ
СхСхСхСхСхСхСхСхСхСхСхСхСхСх~~~~~~~~~~~
ЯТПЮЃЁ
Ц№СЂЃЁ
ЩСШЫ~~~~~~~~~~~
ЖдБОЮФгавЩЮЪЧыШЅетРяНЛСїЬжТлЃКhttp://bbs.jcwcn.com/thread-86866-1-1.html
БОаТЮХЙВ5МђЕЅЕФ,ЮвУЧНЬФу,ЩюАТЕФ,ФуРДЗжЯэ,ЗЧжїСїееЦЌ|qqkongjian|feizhuliu|tupian|luntan|psjiaocheng|bishua|ruanjian|chajian|xiazai|psxiazai|qqkongjiandaima
ЯпИхЃК
зюКѓаЇЙћ
БОаТЮХЙВ5
ЯТУцЮвОЭМђЕЅЫЕЯТЙ§ГЬАЩЃКЃЉ
ЧхЯп
ЁЄДђПЊдЄЯШзМБИКУЕФЯпИхЃЌвЛАуЪЧЩЈУшИхМўЃЌвВгаИїжжИёЪНЕФЪѓЛцЯпИх
ЧхИх
ЁЄЪЙгУЩЋНзУќСюЃЌЖдЯпИхНјааЖдБШЖШЕФЕїећЃЌЪЙЯпЬѕИќУїЯдЃЌВЂГ§ШЅЫщЯпЃЌдгЕуЁЃ
БОаТЮХЙВ5
бЙЯп
ЁЄЪЙгУИжБЪЙЄОпЖдЪЅвТНјааАЕВПЕФЙДЯпЁЃЃЈЭЗВПЮЊЕЙЃЉЙДЯпЪБзЂвтЬдЬЕФЗНЯђЕШЁЃЭЌбљНЋЪЅвТЦфгрЕФВПЗжЙДЯпЁЃ
ЁЄЪЙгУТЗОЖЬюГфЙЄОпЖдЪЅвТНјааАЕВПЕФЬюГфЁЃЃЈНЈСЂЯргІЕФЭМВузщИќЗНБуЙмРэЃЉЁЃ
БОаТЮХЙВ5
зХЩЋ
ЁЄИљОнЬсЙЉЕФВЮПМЭМбЁШЁЯргІЕФЗЖЮЇгУЬюГфЙЄОпЖдЪЅвТНјааГѕВНЕФЬюГфЁЃЃЈНЈСЂЯргІЕФЭМВузщМАЭМВуЃЌИќЗНБуЙмРэЃЉ
ЁЄгУМгЩю/МѕЕЙЄОпЖдЪЅвТНјааЯИВПЕФУїАЕЙ§ЖЩЃЌВСГівѕгАКЭИпЙтЁЃ
БОаТЮХЙВ5
ЁЄЭЌбљЃЌЮвУЧНјааЦфгрВПЗжЕФзХЩЋЃЌШчЙћОѕЕУбеЩЋгаЮЪЬтПЩвдбЁдёЯргІЕФЭМВуНјааЕїећЁЃетбљОЭЛљБОЭъГЩСЫЁЃФувВПЩвдМгЩЯздМКЯВЛЖЕФБГОАЁЃетЮвОЭВЛЖрЫЕСЫЁЃ
КУСЫЃЌдйКѓУцЕФОЭгЩДѓМвздМКЗЂЛгСЫКЧКЧЃКЃЉ
СхСхСхСхСхСхСхСхСхСхСхСхСхСх~~~~~~~~~~~
ЯТПЮЃЁ
Ц№СЂЃЁ
ЩСШЫ~~~~~~~~~~~
ЖдБОЮФгавЩЮЪЧыШЅетРяНЛСїЬжТлЃКhttp://bbs.jcwcn.com/thread-86866-1-1.html
БОаТЮХЙВ5МђЕЅЕФ,ЮвУЧНЬФу,ЩюАТЕФ,ФуРДЗжЯэ,ЗЧжїСїееЦЌ|qqkongjian|feizhuliu|tupian|luntan|psjiaocheng|bishua|ruanjian|chajian|xiazai|psxiazai|qqkongjiandaima
бЇЯА ЁЄ ЬсЪО
- вЛЖЈвЊДђПЊPSЃЌИњзХНЬГЬзівЛБщЃЌзіЭъЕФЭМЕНетНЛзївЕЃКЬсНЛзївЕ
- НЈвщСЗЯАЪБЃЌДѓМвздМКевЫиВФЃЌОЁСПВЛвЊгУНЬГЬЬсЙЉЕФЫиВФЁЃ
- НЬГЬгаПДВЛЖЎЕФЕиЗНЃЌПЩвдЕНТлЬГЗЂЬћЬсЮЪЃКаТЪжЧѓжњ
- МгЙйЗНЮЂаХЃЌЫцЪБЫцЕиЃЌЯыбЇОЭФмбЇЃКps_bbsЃЌЛђЩЈгвВрЖўЮЌТыЃЁ
- ЙизЂЮвУЧбЇИќЖрЃЌУПЬьЖМгааТНЬГЬЃКаТРЫЮЂВЉ ЖЖвєЪгЦЕ ЮЂаХаЁГЬађ
ЯрЙиНЬГЬ
- ЭМЦЌЩЯЩЋЃЌЭЈЙ§PSИјИЩЛЈНјааЩЯЩЋДІРэ
- ееЦЌЩЯЩЋЃЌЭЈЙ§ЪЕР§ИјХФЩуЕФЭтОАШЫЯёНјааЩЯЩЋ
- ЯпИхЩЯЩЋЃЌгУpsИјЧщТТЖЏТўЯпИхећЬхШѓЩЋ
- ЩЯЩЋНЬГЬЃЌгУPSАбКкАзееЦЌБфГЩВЪЩЋ
- ЩЯЩЋНЬГЬЃЌРЯОЩКкАзееЦЌЩЯЩЋНЬГЬ
- ЛЛвТЗўЃЌгУPSИјЫљашвТЗўЛЛИібеЩЋ
- ЗчОАееЩЯЩЋЃЌИјКкАзЗчОАееЦЌЩЯЩЋаЁММЧЩ
- ОЩееЩЯЩЋЃЌИјЗЂЛЦЕФРЯОЩееЦЌЩЯЩЋНЬГЬ
- ЯпИхЩЯЩЋЃЌИјЯпИхЩЯЩЋжЦзїГіСЂЬхН№ЪєаЇЙћ
- ЩЯЩЋНЬГЬЃЌИјЪжЛцПЈЭЈТўЛШЫЮяЩЯЩЋЁЃ
ЙизЂДѓЩёЮЂВЉМгШы>>


ЭјгбЧѓжњЃЌЧыЛиД№ЃЁ