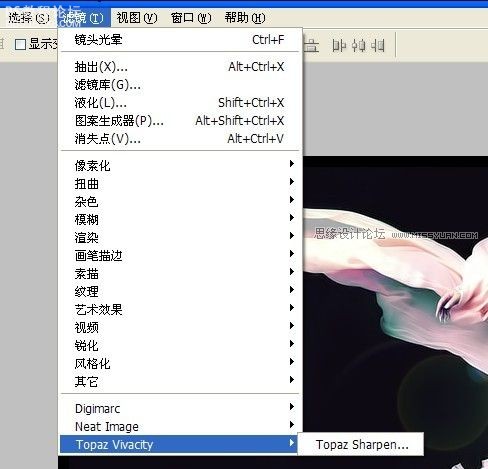
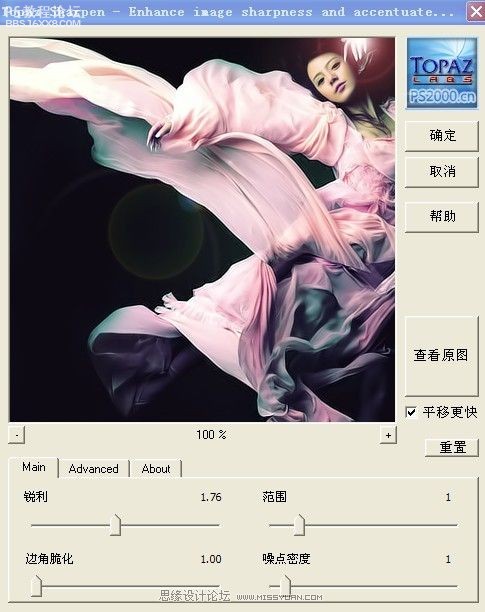
photoshop��ɫ�̳̣���ҵ�������Ӿ�Ч��
��Դ��δ֪
���ߣ�laoolaoo
ѧϰ��1070�˴�
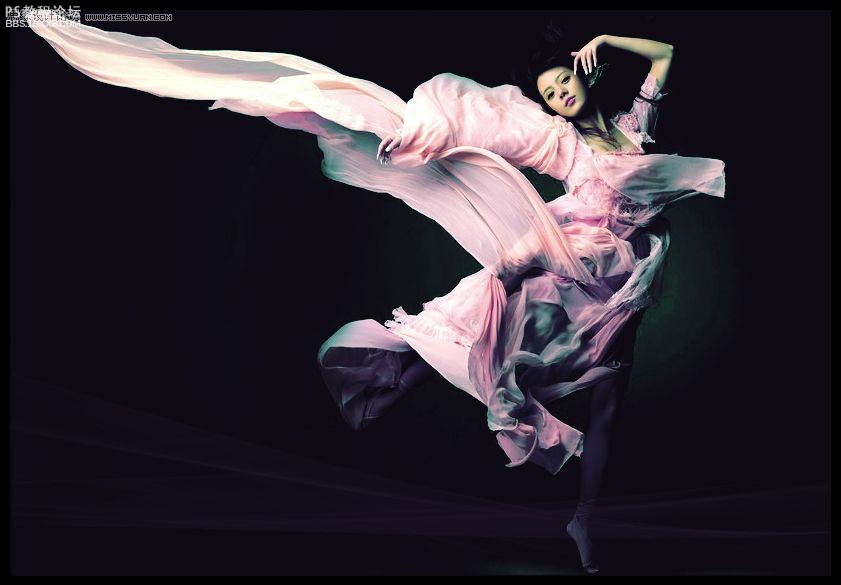
���̳���Ҫ��photoshop������һ����ҵ�������Ӿ�Ч����Ƭ��,�����ɫ�ʸ��˵ĸо��е㸴��,Ȼ����TOPAZ����Ƭ����һ��,�����Ч���ͳ�����.
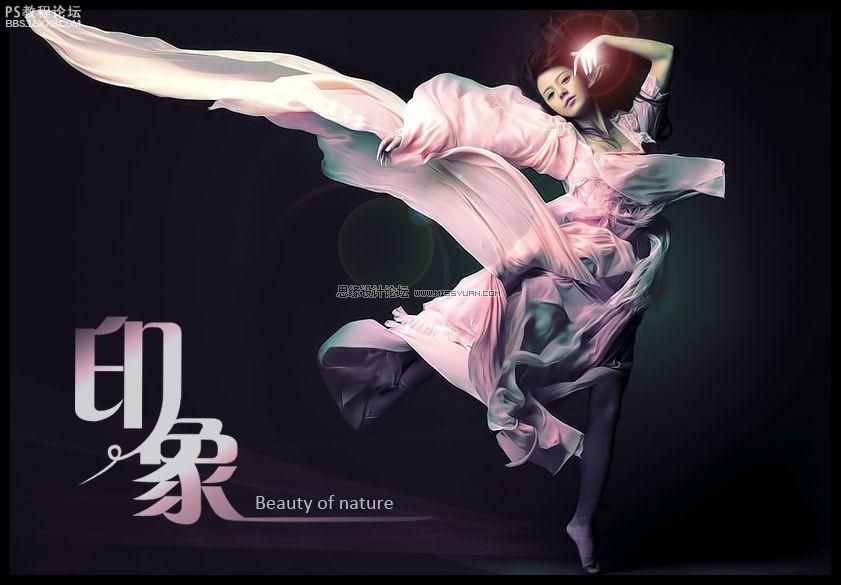
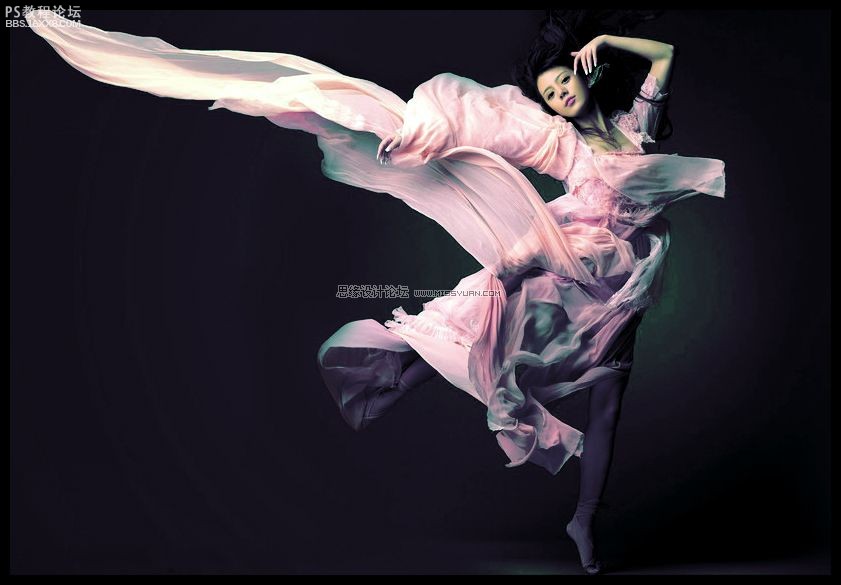
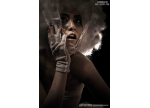
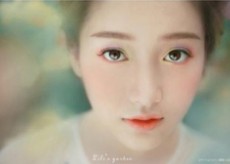
1)�ȿ���Ч��ͼ
2)�ز�ͼƬ
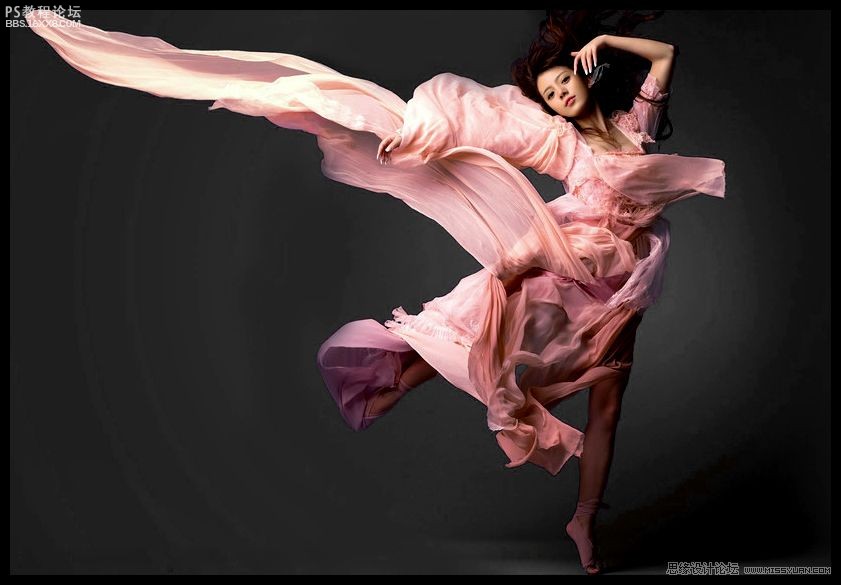
,
3)����ŮͼƬ�����ͼ������е� ǰ�� 19:28������ɫ��ƽ��Ϳ�ѡ��ɫ�����㡣 (1)ɫ��ƽ���е���Ӱ�߹����ã����м������ (2)��ѡ��ɫ��һЩ��ɫ�������á� (3)���ú�Ч��ͼΪ��ͼ
3)����ŮͼƬ�����ͼ������е�

ǰ�� 19:28������ɫ��ƽ��Ϳ�ѡ��ɫ�����㡣
(1)ɫ��ƽ���е���Ӱ�߹����ã����м������
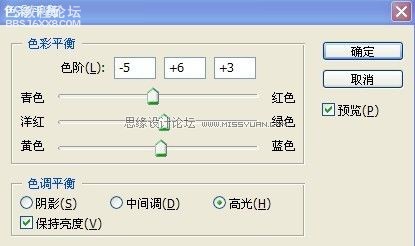
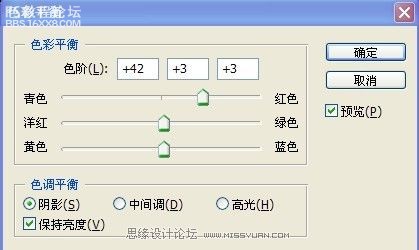
(2)��ѡ��ɫ��һЩ��ɫ�������á�
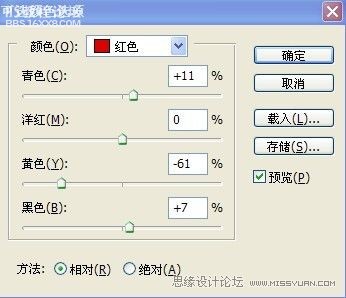
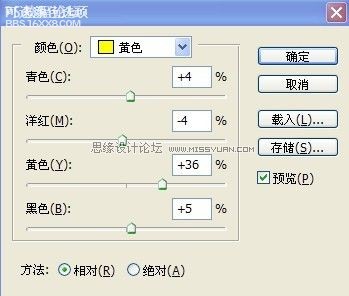
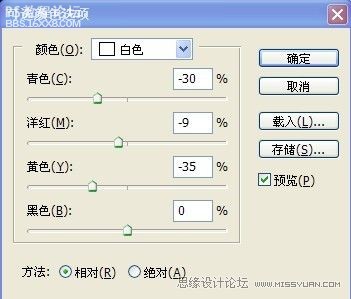
(3)���ú�Ч��ͼΪ��ͼ
,
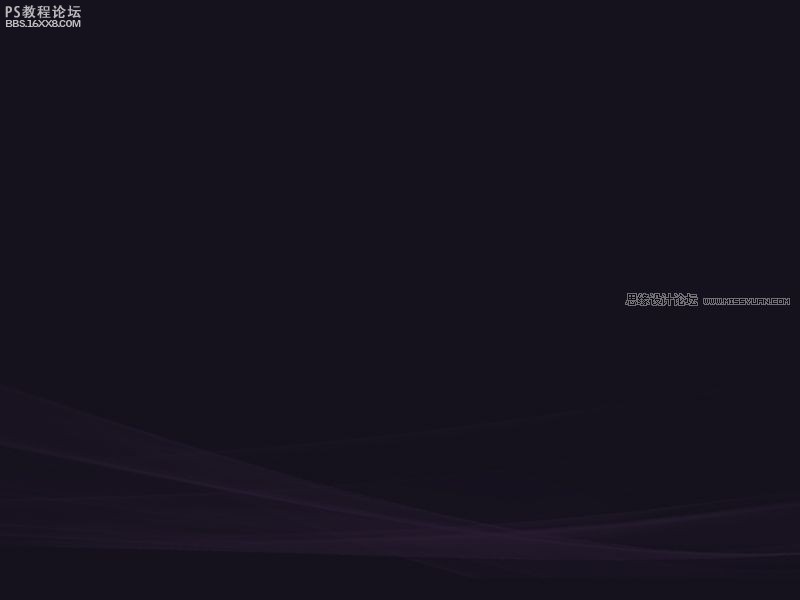
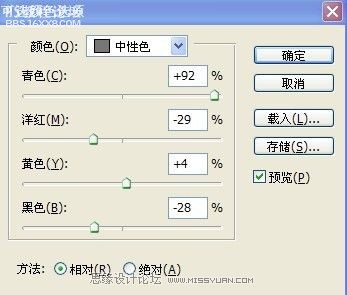
4)���ز�ͼƬ����Ϊͼ��2��ctrl+t��������?���ͼ��ģʽ��Ϊ������Ȼ���½�ͼ��Ϊͼ�?.ctrl+alt+shfit+e���ϲ�ͼ�㣬�ڸ���ͼ��3.��ͼ��ģʽ��Ϊ��⣬������Ϊ50% ����Ч��Ϊ�� 5)�½�ͼ��4������ɫ���˾�--
4)���ز�ͼƬ����Ϊͼ��2��ctrl+t��������С����ͼ��ģʽ��Ϊ����������Ȼ���½�ͼ��Ϊͼ��3.ctrl+alt+shfit+e���ϲ�ͼ�㣬�ڸ���ͼ��3.��ͼ��ģʽ��Ϊ����⡱��������Ϊ50%
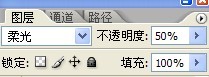
����Ч��Ϊ��
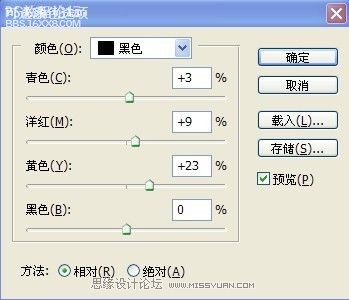
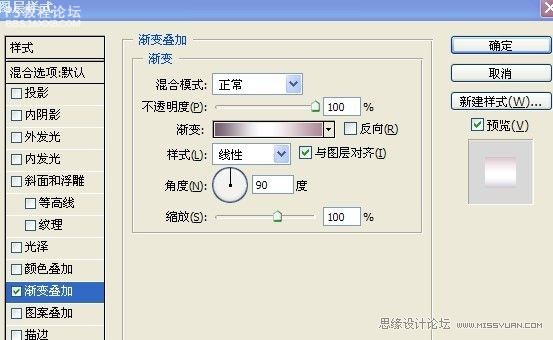
5)�½�ͼ��4������ɫ���˾�--��Ⱦ--��ͷ���Ρ�������ͼ��ģʽ��Ϊ����ɫ��.ctrl+t�����������Ч������ͼ��


,
6)д������ӡ��դ�����֣�ɾ�����õIJ��֡� 7)�½�ͼ�㡣�øֱʹ��߹�������ͼ��Ч������ctrl+enterת��Ϊѡ��������ɫ������Ч��Ϊ��ͼ�� 8)�ϲ������������йص�ͼ�㡣˫��������ͼ����ʽ�� 9)�½�ͼ��
6)д�����֡�ӡ����դ�����֣�ɾ�����õIJ��֡�


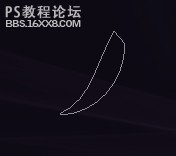
7)�½�ͼ�㡣�øֱʹ��߹�������ͼ��Ч������ctrl+enterת��Ϊѡ��������ɫ������Ч��Ϊ��ͼ��


8)�ϲ������������йص�ͼ�㡣˫��������ͼ����ʽ��
9)�½�ͼ�㡣ctrl+alt+shfit+e���ϲ�ͼ�㣬�����û�����ء�topaz�˾��������ء�
����������
1)�ȿ���Ч��ͼ
2)�ز�ͼƬ
,
3)����ŮͼƬ�����ͼ������е� ǰ�� 19:28������ɫ��ƽ��Ϳ�ѡ��ɫ�����㡣 (1)ɫ��ƽ���е���Ӱ�߹����ã����м������ (2)��ѡ��ɫ��һЩ��ɫ�������á� (3)���ú�Ч��ͼΪ��ͼ
3)����ŮͼƬ�����ͼ������е�
ǰ�� 19:28������ɫ��ƽ��Ϳ�ѡ��ɫ�����㡣
(1)ɫ��ƽ���е���Ӱ�߹����ã����м������
(2)��ѡ��ɫ��һЩ��ɫ�������á�
(3)���ú�Ч��ͼΪ��ͼ
,
4)���ز�ͼƬ����Ϊͼ��2��ctrl+t��������?���ͼ��ģʽ��Ϊ������Ȼ���½�ͼ��Ϊͼ�?.ctrl+alt+shfit+e���ϲ�ͼ�㣬�ڸ���ͼ��3.��ͼ��ģʽ��Ϊ��⣬������Ϊ50% ����Ч��Ϊ�� 5)�½�ͼ��4������ɫ���˾�--
4)���ز�ͼƬ����Ϊͼ��2��ctrl+t��������С����ͼ��ģʽ��Ϊ����������Ȼ���½�ͼ��Ϊͼ��3.ctrl+alt+shfit+e���ϲ�ͼ�㣬�ڸ���ͼ��3.��ͼ��ģʽ��Ϊ����⡱��������Ϊ50%
����Ч��Ϊ��
5)�½�ͼ��4������ɫ���˾�--��Ⱦ--��ͷ���Ρ�������ͼ��ģʽ��Ϊ����ɫ��.ctrl+t�����������Ч������ͼ��
,
6)д������ӡ��դ�����֣�ɾ�����õIJ��֡� 7)�½�ͼ�㡣�øֱʹ��߹�������ͼ��Ч������ctrl+enterת��Ϊѡ��������ɫ������Ч��Ϊ��ͼ�� 8)�ϲ������������йص�ͼ�㡣˫��������ͼ����ʽ�� 9)�½�ͼ��
6)д�����֡�ӡ����դ�����֣�ɾ�����õIJ��֡�
7)�½�ͼ�㡣�øֱʹ��߹�������ͼ��Ч������ctrl+enterת��Ϊѡ��������ɫ������Ч��Ϊ��ͼ��
8)�ϲ������������йص�ͼ�㡣˫��������ͼ����ʽ��
9)�½�ͼ�㡣ctrl+alt+shfit+e���ϲ�ͼ�㣬�����û�����ء�topaz�˾��������ء�
����������
ѧϰ �� ��ʾ
- ������ | ����ҵ -
��������
�Բ���ؼ��û��Ȩ����2018-06-11 02:05
���������
�ظ�
kxk2522010-12-06 01:11
���ι���ǿ�ƽ�פ��Ц������������ļ��Ϸ��Ӣ�齨��ǿ�Ŷ�!��־����Ц��������һ���ᣬ����������Ϸ�����룬��ӭ����Ȱ�Ц��������Ϸ�����Ѽ��룬500�˳�������Ⱥ��32739329
kxk2522010-12-06 01:12
���ι���ǿ�ƽ�פ��Ц������������ļ��Ϸ��Ӣ�齨��ǿ�Ŷ�!��־����Ц��������һ���ᣬ����������Ϸ�����룬��ӭ����Ȱ�Ц��������Ϸ�����Ѽ��룬500�˳�������Ⱥ��32739329
��ؽ̳�
- ��ɴ���ڣ������⾰��ɴ��Ƭ������ɫЧ��
- ��ӰЧ������PS����Ƭ����Ψ���ĸ��Ź�ӰЧ��
- ��ɴ���ڣ���PS���⾰��ɴ����������Ӱ
- ����ɫ�����������Ǹ��ŷ��Ļ�ɴ��
- ��ɴ���ڣ����⾰�����ɵĻ�ɴ��Ӫ��Ϧ��Ч��
- ��ɴд�棬����ҹ��Ч����ɴд��ʵ��
- ����Ч���������Ƭ�����ź��ڵ�ɫ�̳�
- �⾰��ɴ������ʱ��Ư����ҹ��Ч����ɴ�ս̳�
- ��ɫ������������������ɫЧ���̳�
- ��ɴ���ڣ�ҹ����ɴ�պ��ڴ���ʵ��
��ע����������>>


������������ش�