photoshop如何做Skype好友图标(3)
来源:未知
作者:空来风
学习:1232人次
如下效果 :-)

以下是详细的photoshop教程步骤:
用椭圆形工具画个圆圈。

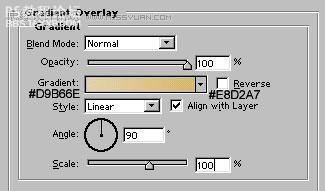
设置如下图层样式


用椭圆工具画出如下选区,也可以同时按 shift+control+n键创建一个新层.
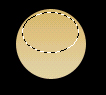
按D改变前景和背景颜色为黑色和白色。按X互换前景色背景色。使用渐变工具,填充所示选区:

改变图层样式。

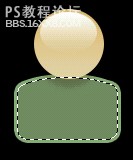
画一个圆角矩形,半径设置为8像素。
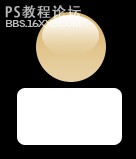
选择椭圆工具,在画的同时按数字键的"+",以添加椭圆到现有的形状

按快捷键shift+ctrl+{,将图形设置到图层的最底层。

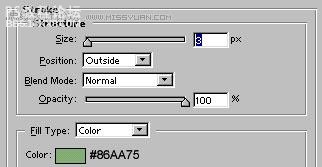
为它设置如下图层样式

,
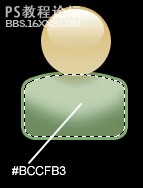
按Control+单击这个图层选择它,建一个新的层。
在新层上用#BCCFB3 颜色填充选区。
新建一层,用多边形套索画出如下选区。
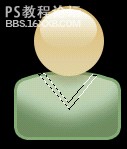
填充选区为白色.

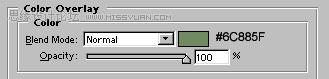
设置如下图层样式。
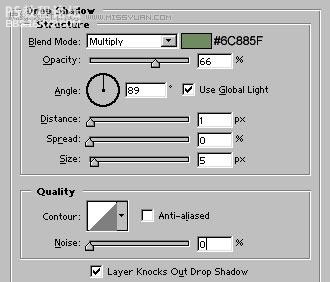
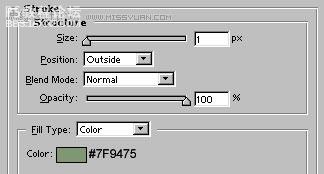
设置如下图层样式
用椭圆工具画出如下选区,也可以同时按 shift+control+n键创建一个新层.
按D改变前景和背景颜色为黑色和白色。按X互换前景色背景色。使用渐变工具,填充所示选区:
改变图层样式。
画一个圆角矩形,半径设置为8像素。
选择椭圆工具,在画的同时按数字键的"+",以添加椭圆到现有的形状
按快捷键shift+ctrl+{,将图形设置到图层的最底层。
为它设置如下图层样式
,
按Control+单击这个图层选择它,建一个新的层。
在新层上用#BCCFB3 颜色填充选区。
新建一层,用多边形套索画出如下选区。
填充选区为白色.
设置如下图层样式。

用钢笔工具画出如图所示形状
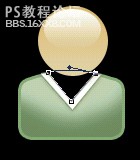
用钢笔工具画出如图所示形状
在这个层上设置类似的图层样式(简便叠加).我们的 Skype图标完成了。
以下是详细的photoshop教程步骤:
用椭圆形工具画个圆圈。
设置如下图层样式
用椭圆工具画出如下选区,也可以同时按 shift+control+n键创建一个新层.
按D改变前景和背景颜色为黑色和白色。按X互换前景色背景色。使用渐变工具,填充所示选区:
改变图层样式。
画一个圆角矩形,半径设置为8像素。
选择椭圆工具,在画的同时按数字键的"+",以添加椭圆到现有的形状
按快捷键shift+ctrl+{,将图形设置到图层的最底层。
为它设置如下图层样式
,
按Control+单击这个图层选择它,建一个新的层。
在新层上用#BCCFB3 颜色填充选区。
新建一层,用多边形套索画出如下选区。
填充选区为白色.
设置如下图层样式。
设置如下图层样式
用椭圆工具画出如下选区,也可以同时按 shift+control+n键创建一个新层.
按D改变前景和背景颜色为黑色和白色。按X互换前景色背景色。使用渐变工具,填充所示选区:
改变图层样式。
画一个圆角矩形,半径设置为8像素。
选择椭圆工具,在画的同时按数字键的"+",以添加椭圆到现有的形状
按快捷键shift+ctrl+{,将图形设置到图层的最底层。
为它设置如下图层样式
,
按Control+单击这个图层选择它,建一个新的层。
在新层上用#BCCFB3 颜色填充选区。
新建一层,用多边形套索画出如下选区。
填充选区为白色.
设置如下图层样式。
用钢笔工具画出如图所示形状
用钢笔工具画出如图所示形状
在这个层上设置类似的图层样式(简便叠加).我们的 Skype图标完成了。
学习 · 提示
相关教程
关注大神微博加入>>


网友求助,请回答!