拼图效果,用PS制作拼图效果图片
来源:公众号
作者:SoulEC
学习:1970人次
大家有没有这种烦恼呢?就是每当要发朋友圈配图的时候总感觉自己的照片平平无奇,不够突出有特色,本篇教程来教你们独特的照片拼图效果。操作起来还是比较简单的,先用矩形工具绘制出拼图的形状,再用定义图案,到图层样式里设置好效果,具体如何操作一起通过PS来学习一下吧。
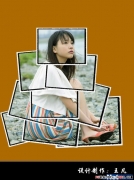
效果图:
 学习PS请到www.16xx8.com
操作步骤:
1、下面让我们准备两张素材(如下)


2、找一张自己心仪的图片和木板素材并用Photoshop打开


3、新建一个200*200像素为72的文档,并用标尺调好位置


4、点击矩形选框工具框选一个矩形并填充黑色,用椭圆做出效果


5、点击编辑-定义画笔预设新建一个画笔预设来为后面的操作做准备

6、复制一层拼图并用Ctrl+T调整好位置,隐藏背景图层,编辑-定义图案

回到选好的照片中,新建一层图层,点击编辑-填充或用快捷键http://www.16xx8.com/photoshop/jiaocheng/110097.htmlShift+F5进行图案填充,并把填充设置为0


7、点击设置图层样式,设置斜面浮雕和描边的参数


8、把木板素材拖进来主素材并调整好大小

9、新建一层图层,点击画笔选择并选择样式为刚才设置的拼图图案画出拼图并Ctrl+T调整好位置

10、按住Ctrl左键点击新建的画笔图层框选出画笔选区,用移动工具调整好位置


重复9、10步骤就可以达到你们自己想要的效果啦


完成:
这种效果还是很棒的,同学们可以找自己想要制作的照片来做拼图效果,相信你可以做的更好。
学习 · 提示
相关教程
关注大神微博加入>>


网友求助,请回答!