ps绘制逼真的油漆毛刷教程

使用Photoshop创建静态物体往往是学习制作其他对象的很好的实践练习。在今天的教程中,我们将演示如何使用图层样式,剪切蒙板以及不常用的混合颜色带,制作一个写实漆刷,让我们开始吧

先看看效果图

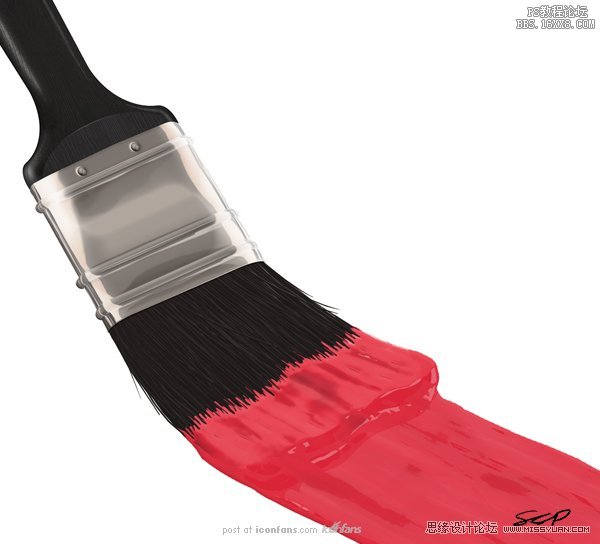
Creating still-life objects inPhotoshop is often great practice for learning how to create other objects. Intoday’s tutorial we will demonstrate how to create a realistic-looking paintbrush using layer styles, clipping masks, andthe not-so-commonly-used blend if sliders. Let’s get started!

使用photoshop创建静态物体往往是学习制作其他对象的很好的实践练习。在今天的教程中,我们将演示如何使用图层样式,剪切蒙板以及不常用的混合颜色带,制作一个写实漆刷,让我们开始吧!

Step 1

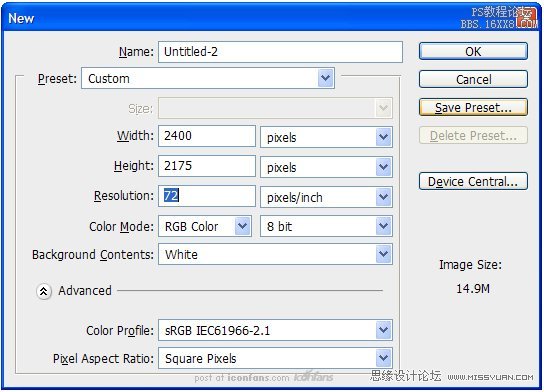
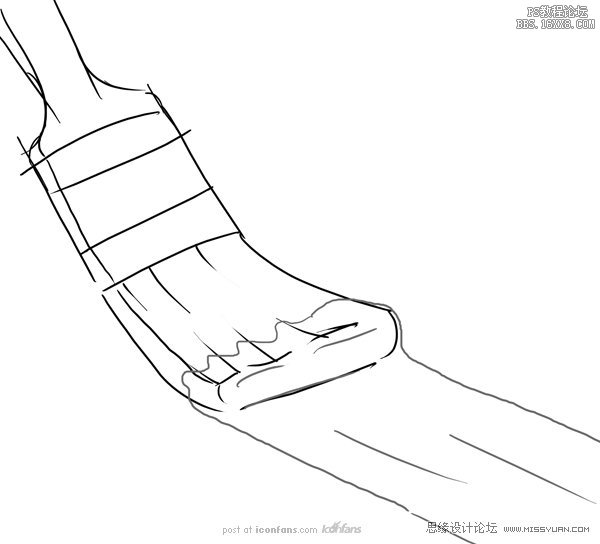
Create a new document (2400px x2175 px). Sketch out a scene of a paintbrush.

(创建一个新的文档(2400px x 2175px),勾画一个漆刷的场景。)

Step 2

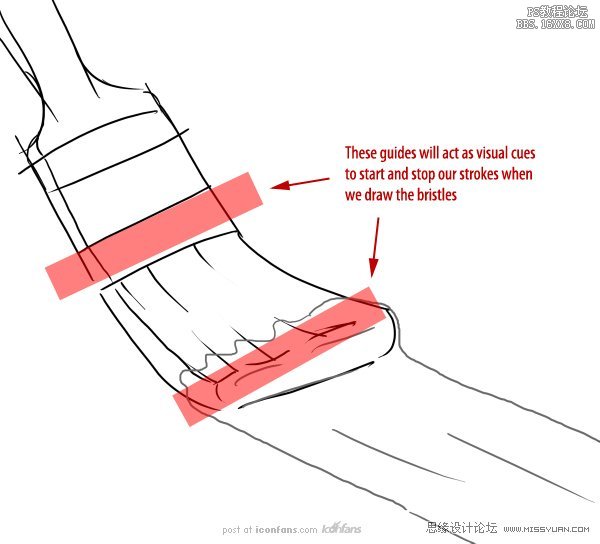
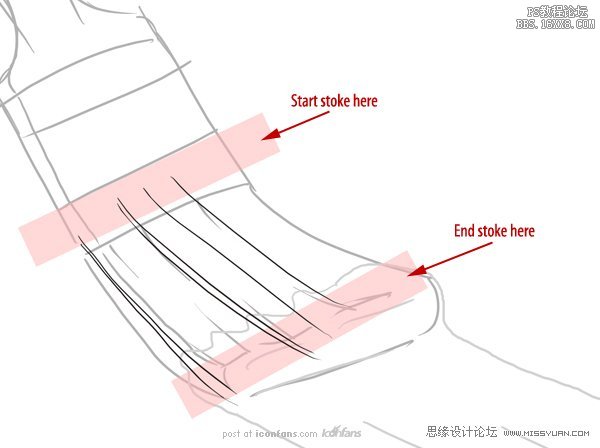
This step is optional, but I’veadded some additional visual guides to help me draw the bristles.

(这一步是可选择的,但是我已经增加了一写额外的视觉指示来帮助我画刷毛。)这些指示将会形象的表现出画刷毛的起始端和结束端。

Step 3

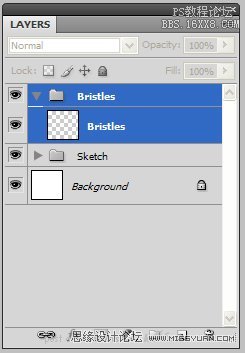
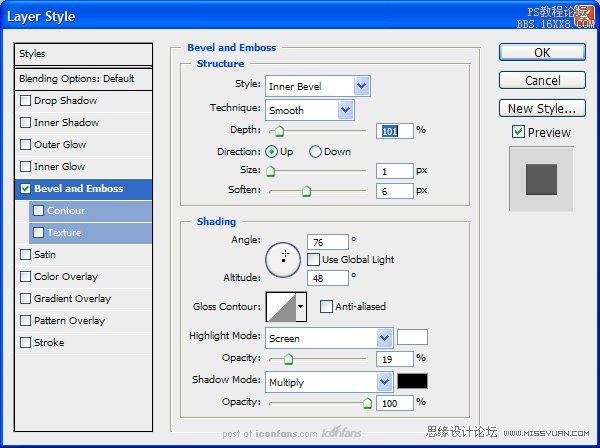
Before we start drawingbristles, create a New Group called “Bristles.” Inside this group, create alayer called “Bristles” and add the following Layer Style.

(在我们开始绘制刷毛前,先创建一个新组命名为“Bristles” 。在这个组里,创建一个名为“Bristles”的图层,并添加下面的图层样式。)
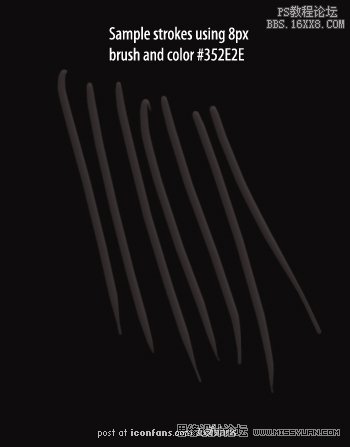
用8px的刷子,颜色#352E2E

Step 4

Duplicate the empty layer 5times. Since we are making a lot of bristles, we are going to be drawing themon five separate layers. If we tried to draw them all on one layer, the strokeswould blend together and ruin the layer style that’s applied. Select thebottom-most layer in the “Bristles” group and, with a small brush, startdrawing lines using the guides and sketch as references.

(复制空白图层5次。我们要画制很多刷毛,所以我们要在5个分开的图层上画。如果我试图仅在一个图层上画所有的刷毛,那当图层被应用时,这些笔画将混在一起,破坏了图层效果。在“Bristles”组里选择一个最底端的图层,用小号刷子,以指示和草图作为参考,开始画制线条。)
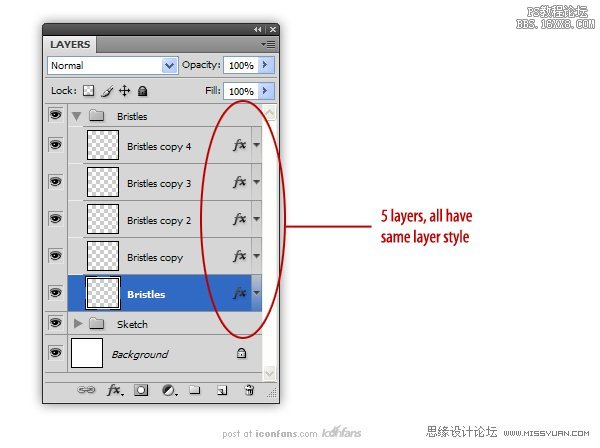
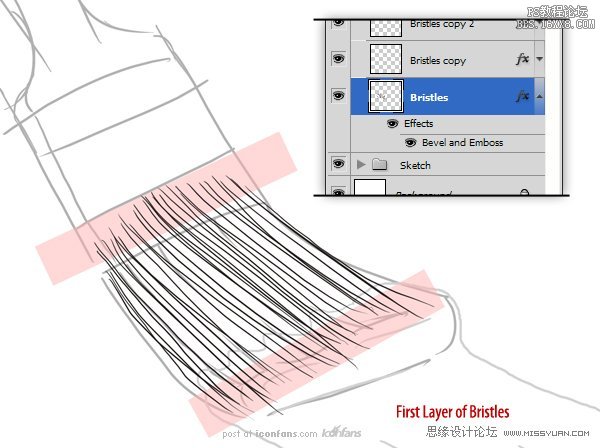
(5个图层,全部使用相同的图层样式)

Step 5

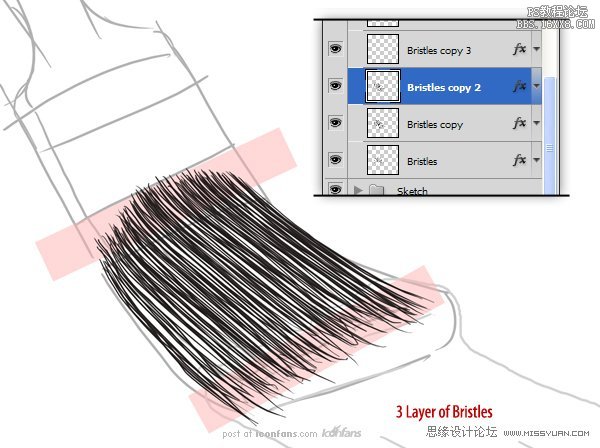
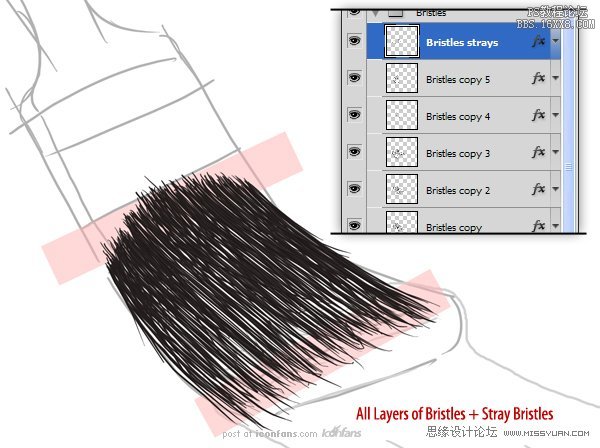
Continue drawing bristles onthe remaining four layers, adding some variation and stray bristles as you go.Feel free to add more layers as you see necessary.

(在四个图层上保持一样地继续绘制刷毛,添加一些变化和波浪刷毛。你觉得必要的话,可以随意添加一些图层。)


Step 6

When you’re done, you’ll notice there are still several gaps in thebrush. To fix this, create a new layer called “Black out” below the “Bristles”group and paint in a dark gray color (#1B1919) to fill all gaps.

(当你完成了,你将会看到在刷子上仍然有一些个别的间隙。为了解决这个问题,在“Bristles”组下创建一个名为“Black out”的图层,然后用深灰色(#1B1919)填补所有的间隙。)

Step 7

Now, we can add the paint on top of the bristles. Create a New Groupcalled “Outside Paint” above the “Bristles” group and use the brush tool to addanother blob of the same color to the tip of the brush. Use the same techniquewith the Smudge Tool to push the color on to random bristles.

(现在我们在刷毛的顶部添加油漆。在“Bristles”组之上新建一个组名为“OutsidePaint”,用画笔工具添加一个相同的颜色到刷子的末端。使用涂抹工具,用同样的手法和技巧随意的拖动刷毛。)

Step 8

To create the effect that thebristles have ‘taken’ the paint, use the Smudge Tool, set to 100%, to push thepaint on to random bristles.

(为了制造出刷毛完全吸收油漆颜料的效果,使用涂抹工具,设置为100% ,随意的拖动刷毛。)

Step 9

Now, we can add the paint ontop of the bristles. Create a New Group called “Outside Paint” above the“Bristles” group and use the brush tool to add another blob of the same colorto the tip of the brush. Use the same technique with the Smudge Tool to pushthe color on to random bristles.

(现在我们在刷毛的顶部添加油漆。在“Bristles”组之上新建一个组名为“OutsidePaint”,用画笔工具添加一个相同的颜色到刷子的末端。使用涂抹工具,用同样的手法和技巧随意的拖动刷毛。)

Step 10

To give the paint some variation, add the following Layer Styles. As anoptional step, you can use the Eraser Tool (E) set to 1 px to erase lines fromthe paint. This will give the illusion that some bristles are showing throughthe paint

(为了让油漆有一些变化,增加下面的图层样式。作为一个可选择的步骤,你可以使用橡皮擦工具(E),设置为1px 的擦除线。这样将会有一种刷毛浸透油漆的感觉

Step 11

Next, we want to merge thelayer effects to that layer. To do this, Right + Click on the “Paint” layer andchoose “Create Layers” (this will convert the layer styles in to their ownlayers). Now, just select all the new “Paint” layers and merge (Command/Ctrl +E).

Paint”Create Layers.PaintCommand/ Ctrl+E.)

Step 12

Next we are going to add the streak of paint. Create a New Layer called“Streak.” Use the Brush Tool to add a streak of paint using the same color ofpaint that is on the bristles.

(接下来我们要添加油漆漆刷的条纹.新建一个名为“Streak”图层,用“画笔”工具增加一个条纹,颜色和刷毛颜色一样。)

Step 13

Next we are going to add thestreak of paint. Create a New Layer called “Streak.” Use the Brush Tool to adda streak of paint using the same color of paint that is on the bristles.

(接下来我们要添加油漆漆刷的条纹.新建一个名为“Streak”图层,用“画笔”工具增加一个条纹,颜色和刷毛颜色一样。)


Step 14

Use the Dodge and Burn Tools toadd some subtle variation to the streak. When you’re done, merge this layerwith the “Paint” layer. Rename the layer to “Paint.”

(用“减淡”和“加深”工具,在条纹上增加一些细微变化。当你完成了,和“Paint”图层一起合并。重命名为“Paint”.)

Step 15

Now, we are going to give thepaint that wet look. To start, create a New Layer called “Highlights 1″ andmake this a clipping layer (use Alt + Click on the Layers Panel).

现在,我们要给油漆湿感,新建一个名为“Highlights 1” 图层,制作一个剪切层(在图层板上使用Alt+单击 )

Step 16

Now, draw in some white highlights as shown. Set this layer’sopacity to 11%

(现在如图所示,绘制一些白色的高光,设置这个图层的不透明度为11%。)

Step 17

Open the layer’s Layer Styles and adjust the “Blend If: UnderlyingLayer” sliders as shown

(打开这个图层的图层样式,调节“混合颜色带”滑标如图所示. )

Step 18

Next, we are going to do thesame with a darker color. Create a new clipping layer called “Lowlights” anduse a darker red to paint in some lowlights.

(接下来,我们将做同样一个较深的颜色。新建一个名为“Lowlights”的剪切层,并使用暗红色涂刷在这些“Lowlights”上。)

Step 19

Set the “Lowlights” layer’sopacity to 72% and open the Layer Styles to adjust the Blend If sliders asshown.

(设置“Lowlights”图层不透明度为72%,打开这个图层的图层样式,调节“混合颜色带”滑标如图所示.)

Step 20

We can keep using thistechnique of adding highlights and adjusting its Blend If sliders to completethe ‘wet’ look of paint (I used this technique to add 3 more highlights).(我们可以用同样的手法添加“highlights”,调节它的“混合颜色带“滑标来完成油漆的湿感(我用这个方法添加了3个以上的“highlights”.)

Step 21

Now that the bristles and paintare done, we can create the rest of the brush. Hide all layers associated withthe paint and bristles. Next, create a New Group called “Handle”. Inside thatgroup, create 2 new groups called “Metal” and “Grip”.

(现在刷毛和油漆已经完成,我们可以创建毛刷的其他部分。隐藏所有有关刷子和刷毛的图层。接下来,新建一个组名为“Handle”。在这个组里,新建2个组,分别命名为“Metal”and “ Grip”.)

Step 22

In the “Metal” group, create aNew Layer called “Metal Band.” Using the sketch as a guide, create the shape ofthe metal band that holds the bristles in place. I found it easier to createthe brush’s handle upright. It may help to go back to the sketch and create acopy to rotate it so that the brush is standing up.

(在“Metal”组里,新建一个图层名为“Metal Band”。以草图为参考,创建能包住刷毛的金属带。我觉得创建一个垂直的刷柄很容易。它可以幫助回到草圖,並創建一個副本,旋轉,這樣的刷子就能竖起来。)


Step 23

Create a New Layer called “Bevels” and draw in some bevels. You can usethe Pen Tool if you wish, but I just used the Brush Tool.

(新建一个图层命名为“Bevels”,画一个一样的斜面。如果你愿意,你可以使用钢笔工具,但是我就用了画笔工具.)

Step 24

Use the “Bevels” layer to makea selection (Command/Ctrl + Click the thumbnail). Use this selection to Cut(Command/Ctrl + X) the “Metal Band” layer. Also cut out some holes for rivets.All of these cuts will give us more edges for the Bevel and Emboss effect inthe next step.

(使用“Bevels“图层作一个选项(Ctrl +点击缩略图)。使用此选项來剪切(/按Ctrl+X)的“Metal Band” 图层。也削減了一些鉚釘孔。在下一个步骤中,我們將給予所有這些切图更多的邊的斜面和浮雕效果)

Step 25

Add the following Layer Stylesto the “Metal Band” layer

给“Metal Band”图层添加下面的图层样式,

Next, add the following layerstyles to the “Bevels” layer.

接下来,给“Bevels”图层增加下面如图所示的图层样式,

The result should resemble theimage below

( 结果图像应该是类似下面如图所示的效果.)

Step 26

Next, create a New Layer called“Rivets.” Add a small circle at each opening on the metal band and add thefollowing layer styles.

“Rivets.”。(接下来,新建一个图层名为“Rivets.”在每个开口的金属带上增加一个小圆圈,并添加下面如图所示的图层样式。)

The image should resemble thefollowing

图像应该是类似下面如图所示.

Step 27

Now, to make the next few steps easier, merge the “Rivets” and“Bevel” layers together. Next, merge the layer styles to the “Metal Band”layer.

(现在,接下来的几个步骤容易些,合并“Rivet“和”Bevel“图层到一起。接着,合并“Metal Band”图层)。

Step 28

Create a New Layer called “Reflections” and make this a clipping layerto the “Metal Band” layer. Use a dark color to draw in several lines to createthe illusion of a reflection.

新建一个图层名为“Reflections”,并做个剪切图层到“Metal Band”图层.用深色画几条线,创造出一种映像效果。


Step 29

Create another clipping layer called “Highlights 1.” Using a lightercolor, draw in some highlights as shown. Use the Burn Tool to give the colorsome variation and the Blur Tool to soften some of the highlights.

(建一个名为“Highlight 1.”的剪切层,用较淡的颜色,画一些亮点,如图所示。用“加深”工具使一些颜色变化,用“模糊”工具使一些亮点柔和。)

Step 30

Create another clipping layer called “Highlights 2″ and using thesame techniques from the previous step, add some additional highlights.

(建一个名为“Highlight 2.”的剪切层,与之前的步骤一样,用同样的手法添加一些额外的亮点。)

Your image should resemble the following

你的图像应该是类似下面如图所示.

Step 31

Now that we’ve added reflections and highlights as clipping layersto the “Metal Band” layer, we will use the same techniques to add reflectionsand highlights to the bevels. After this is done, add any additional details asyou see fit.

(现在我们已经添加了一些映像和亮点在“Metal Band”内的剪切层上 ,我们将用同样的方法在斜面“Bevels”上添加一些映像和亮点。这个做完以后,你可以增加一些你认为合适的额外细节。)

Step 32

Create a New Layer called “Grip” inside the previously created“Grip” group. Draw the shape of a brush handle and fill with black. Give thissome noise (Filter > Noise > Add Noise) with a setting of 10%.

(在之前我们创建的“Gip”组里新建一个名为“Gip”的图层。画一个刷柄的形状,并用黑色填满。給一些的杂色(濾鏡>添加雜色)設定为10%。

Step 33

Before we finish the grip, rotate and skew the “Handle” group in toposition in our scene. Unhide the “Sketch” and “Bristles” group to help withthe positioning.

在我们完成把手指前,旋转和倾斜组“Handle”到我们场景中相应的位置。将之前隐藏起来的“Sketch”和“Bristles”组,取消隐藏以便于定位。

Step 34

Now, we are going to start texturing the grip. We will do this witha series of clipping layers. Create a new clipping layer to the “Grip” layerand, using a soft brush, paint a portion of it white (see image below). Setthis layer’s opacity to 3%.

现在我们将开始把手的纹理结构,我们将用一系列的剪切图层来完成这个。新建一个剪切层到“Gip”组,用一个软刷,描绘出白色部分(如图)。设置这个图层的不透明度为3%。

Step 35

On a new clipping layer, draw a thinner highlight on the grip.Change the opacity to 23%. Open the Layer Styles and adjust the layer’s BlendIf sliders as shown (this will break up the highlight so it doesn’t appearunnaturally smooth).

在一个新的剪切层上,在把手上绘制一条薄的高光。将不透明度改为23%。打开图层样式,调节“混合颜色带“滑标如图所示。(这样可以打破高光,因此不会出现不自然的平滑)


Step 36

I want to add some scratches to the bush’s handle for some addedrealism. To do this, open a new document and make a thin brush stoke. Selectthe stroke and go to Edit > Define Brush Preset to make it into a brush.

我想在刷柄上添加一些刮痕,这样就增加了一些真实感。为了达到这点,打开一个新的文档,做个很薄的笔触。选定这个点并进行编辑>定义画笔预设,使之成为一笔刷

Step 37

Open your Brush Panel and adjust the settings to give the new brush variable size and scatter.

打开你的刷子面板,调节设置刷子的可变尺寸和分散度。

Step 38

Back to the main document, on an new clipping layer, use the scratchesbrush we just created to draw black scratches on the grip.

回到主文档,在一个新的剪切层上,用我们之前建好的带有刮痕的刷子,在把手上画制黑色刮痕。

Step 39

Create another clipping layer and add a few more scratches, thistime in white. Adjust the opacity of both layers so the scratches are barelyvisible (darker monitors might have trouble picking this up). Your image shouldresemble the following:

创建另一个剪切层和添加一些划痕,这一次为白色。调节两个图层的不透明度,使划痕不是很明显(深色的显示器用这个方法可能比较麻烦).你的图应该类似如图所示:

划痕看起来是很精细,轻薄的。

Step 40

As an optional step, you can go in to the “Metal Band” layer and usethe same scratches brush to add scratches to the metal.

作为一个可选择的步骤,你可以去“Metal Band”图层,并用同样的手法在金属上添加一些划痕。

Step 41

Back in the “Handle” group, on a new clipping layer, use the BrushTool to paint a soft highlight as shown (make sure you are not using theScratches brush). Change the Blend If settings as shown and change its opacityto 80%.

会到“Handle”组,在一个新的剪切层上,用画笔工具画一个如图所示的软高光(请确保你没有用划痕刷)。改变它的颜色混合带如图所示,并改变它的不透明度为80%。

Step 42

On an new clipping layer, create another, thinner highlight on topof the last one. Adjust the Blend If settings similar to the last layer we didand change the Opacity to 12%.在一个新的剪切层上,在顶部创建另一个高光亮点,并12%

Step 43

On a new clipping layer, create an oval and fill it with white.Rotate it in to perspective and add a layer mask to erase part of the bottom ofthe oval. Adjust the Blend If slider and set its Blending Mode to Overlay.

在一个新的剪切层上,创建一个椭圆形,并用白色填满。旋转角度到如图所示的位置,并添加一个图层蒙板擦除的椭圆形的底部。调节混合颜色带,并设置混合模式为叠加。


Step 44

Use a Brush Tool to add a bit of a highlight on the bevel. Use theBlur Tool to soften the highlight.

用画笔工具在斜面上添加一小块高光。使用模糊工具来软化亮点。

Step 45

Lastly, we can go back through the image to add some detail or makeminor adjustments.

最后,我们可以回到图像,增加一些具体的或细节调整。

Step 46

Unhide all the working layers and you’re finished. If you want to,you can use the original “Grip” layer to add different textures. In this case,I’ve added a faux wood finish using a texture I’ve already created usingPhotoshop.

如果你愿意,你可以用原始的“图层添加不同的质地,结构。在这里,我已经增加了一个之前我就用建好的人造木头的纹理.

最终图像

全教程完,学完记得交作业。如果本教程对您有所帮助,请推荐给你的朋友。

【原创教程 投稿邮箱: ps@16xx8.com】

长按二维码关注我们

关注我们微博:@photoshop教程论坛

推荐教程